How to Migrate from HTTP to HTTPS For SEO and Google

In the past, making sure that your website had a SSL certificate installed was only necessary for pages on your website that required secured connections, such as e-commerce checkout pages or forms that required sensitive data, such as login or certain contact forms. You can see if a website has a SSL cert installed by seeing https instead of http in your web browser’s address bar. Pushing data over SSL connections would cause a higher overhead on web server resources, so it was important to only have parts of your website secured that were only absolutely necessary. Over the last few years, Google has been hinting to the SEO and web development community that they prefer that ENTIRE websites to be secure. This not only helps with making your website secure, but also helps with optimizing and ranking your website on the search engines. Google even made it official by showing notices in website owner’s Google Search Console and sending out emails. Now, sometimes when a the admin for a website sees notices such as these, they don’t take it that seriously, especially for something that can seem as daunting as converting your website from http to https. Now that Google is showing “Not Secure warnings in Chrome’s address bar, website owners are starting to take notice.

If a website doesn’t have SSL on the web page you are viewing, you will see an exclamation icon. If you click on that icon you will see the following warning that the connection to the website is not secure.
It is important at this point to seriously consider migrating your entire website from a http to https, but there are SEO implications when performing this upgrade. If not done correctly, the upgrade can have terrible consequences on your website’s SEO, and therefore can affect how your rankings appear not only on Google, but on other search engines as well.
If a website has SSL installed on their website, within Chrome’s address bar you will see a green padlock icon along with http:// in a green color.
Table of Contents
- Introduction
- What Are The SEO Benefits of HTTPS over HTTP?
- First, Install a SSL Certificate On Your Webserver
- How To Move from HTTP to HTTPS For Your Website
- Determine How The URLS of Your Website Are Served
- Update Website For Any Hard Coded URLS to Change
- Updating URLS if Your Website Is Based On WordPress
- Updating Internal URLS Using Other Methods
- Test Your Website To Make Sure All URLS Returned Are HTTPS and Not HTTP
- Some Reasons Why URLS Did Not Get Updated
- Setting Up Redirects From HTTP to HTTPS Webpages
- Other HTTP to HTTPS Migration Tasks You Should Perform
- Summary
What Are The SEO Benefits of HTTPS over HTTP?
Google is all about showcasing the best results to people searching online, and having a secured website with the HTTPS protocol sends a trust signal to the search engine. This will give your website a slight ranking boost since Google has determined that your website transfers information more securely then a website that doesn’t.
You should also be able to receive more referral data in your Google Analytics account once you migrate over to HTTPS. On an HTTP site, you might see a lot of direct traffic referrals, and by switching to HTTPS, you should see more accurate analytic data.
Also, since HTTPS encrypts data as someone browses your website, it cannot be intercepted by someone or something that is trying to steal data while on your website.
While this article is not entirely exhaustive in explaining every single possible scenario, we have outlined some of the core tasks that you should consider when performing this very important migration and how it can affect your website’s search engine optimization.
First, Install a SSL Certificate On Your Webserver
If you don’t already have a Secure Socket Layer (SSL) certificate installed for your website, you will first need to get that set up and installed on your web hosting account. If your web host offers cPanel, and you are technically adept, you can install the SSL cert yourself. If not, you should contact your web hosting company and ask them to install the SSL cert for you. In the past, SSL certs involved an annual fee, but recently many web hosts offer free SSL certs. The free versions of these certs don’t offer as many features as ones that you pay for, such as showing site seals and other features, but if the main reason of migrating is to avoid those browser warnings, then the free ones should work out fine.
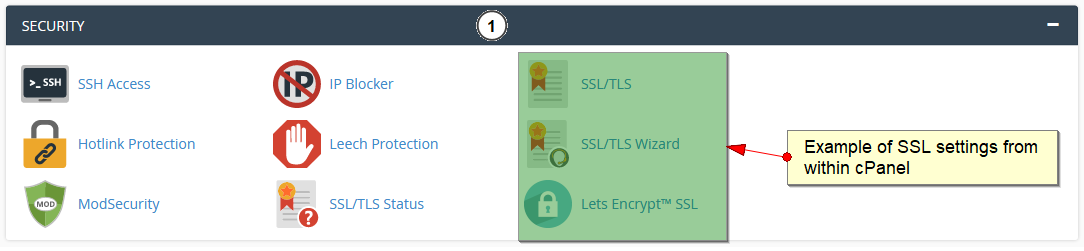
Here is an example of some of the security settings from within a web hosting provider’s cPanel.
After you have the SSL cert installed, you are ready to start transitioning from HTTP to HTTPS on your website.
How To Move from HTTP to HTTPS For Your Website
Now that you have your SSL cert installed you need to plan on migrating your website from HTTP to HTTPS. There are several different methods of performing this upgrade, and it depends on multiple factors. The first thing to consider is the size and complexity of your website.
- Large and Complex Websites
If you have a very large and complex website with thousands of web pages, such as an ecommerce site, then you will want to set up a testing or development version of the site on your web hosting account. That way you can work on each task individually and test everything before you “go live” with your website. - Smaller and Less Complex Websites
If you have a smaller website that is okay if experienced some down-time with this upgrade, then perhaps you can make the changes on a live website. Keep in mind, that if you do it this way, if you run into any problems, it is more difficult to revert to fix them, and it can become stressful pretty quickly.
Determine How The URLS of Your Website Are Served
While there are some websites that are just static HTML pages with no database connected to them, the vast majority of websites that are online today are dynamic, meaning, they are partially rendered from a database. These types of websites might have an administrative backend that controls many different elements of how your website is displayed, and one of the main settings might be the domain settings or URL settings. This is where the vast majority of your web pages will be controlled from, so making the switch from HTTP to HTTPS will be as simple as updating the domain or URL here. Some examples of website’s that have these settings are WordPress, Drupal and other CMS (Content Management Systems) as well as e-commerce shopping cart software such as OpenCart, Shopify and others.
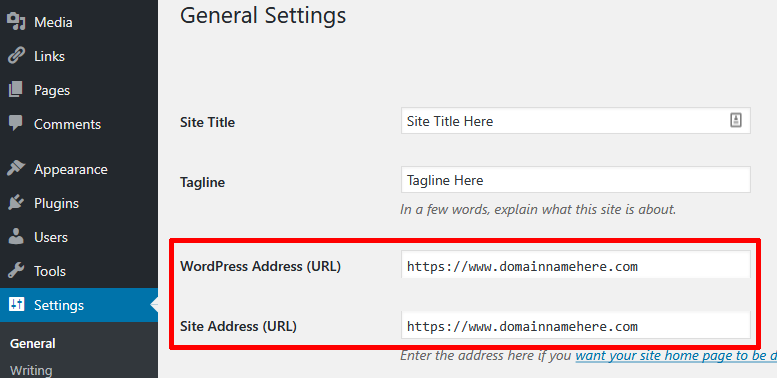
Here is an example of how the domain settings are within WordPress.
Many of these database driven websites also have their domain or URL settings within a configuration or config file.
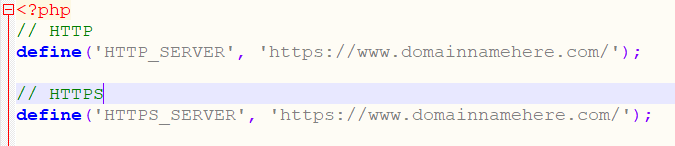
An example of a website’s config file. This one is for an OpenCart website.
Many times, the config file’s HTTP and HTTPS settings are listed as separate variables to define. In this case, you need to enter in the HTTPS version for both, tricking the website into serving all pages as secure pages. You can see that in the example above for an OpenCart powered e-commerce website.
Update Website For Any Hard Coded URLS to Change
Once you are done with updating the HTTP and HTTPS settings in your website administrative area and any config files, there might be some hard coded URLS within your web pages that are not setup as relative URLS. These may have been linked or hard coded to refer to the full URL of your website, also known as the absolute URL, including your domain name.
Relative URLS: These are URLs that do not refer to either the http or https protocol and domain name, but instead refer to the URL as it relates to the location from within the current web page. For example, if you were on your home page at https://www.surgestream.com and from within that page you wanted to link to the services page located at https://www.surgestream.com/services/, you would link to it as /services/ instead.
Absolute URLS: These are URLs that refer to either the http:// or http:// protocol, plus your domain name, then the web page url. For example, if you were on the home page at https://www.surgestream.com and wanted to link to the Services page as an absolute URL, you would link to it as https://www.surgestream.com/services/
For SEO purposes, it is generally recommended that you created links with absolute URLS since using relative URLS can become problematic over time. But in this situation where you want to update all of the hard coded links on your website, you wouldn’t have to deal with this part of the update since it would already be taken care of.
There are a few different ways of updating any embedded or hand coded internal links on your website from HTTP to HTTPS, and it depends on how your website was developed.
WARNING: Before you perform mass updates to your website, you should perform a backup of your entire website in case you run into any problems and have to perform a restore of your website. If you are not confident you can perform the following tasks you should have a competent web developer work on transitioning your website from HTTP to HTTPS.
Updating URLS if Your Website Is Based On WordPress
If your website was created using WordPress, there is a very handy plugin called Better Search Replace which allows you to search and replace any versions of your http pages into https.

Once you have installed and activated the Better Search Replace plugin, you can access it under the Tools section in your admin.

Here you will see the settings to enter to search and replace for.
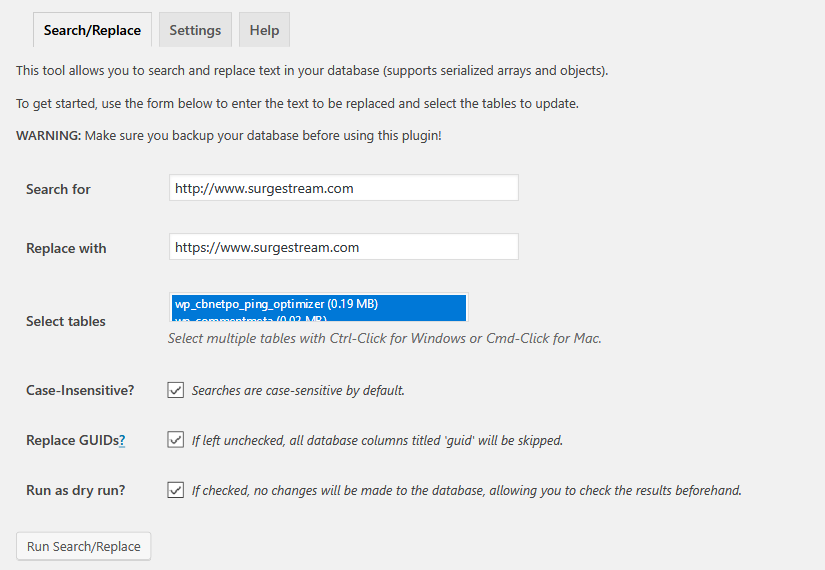
- In the “Search for” text area, enter in the http version of your root domain. For example, http://www.yourdomainnamehere.com
- Then in the “Replace with” text area, enter in the https version of your root domain. For example, as http://www.yourdomainnamehere.com
- Since you want to check your entire website, where it says “Select tables” make sure you select all tables.
- Check the “Case-Insensitive” and “Replace GUIDs” check boxes.
- Also, it is a good idea to test the change before you actually do it, so check the “Run as dry run?” check box.
- Double check all of your settings, especially the “Search for” and “Replace” with sections, and click on the “Run Search/Replace”
Once it is completed, you will see listed at the top of the page your results. Since this was a dry run it will say “DRY RUN” followed by your results.

Once you are satisfied with your results, you can repeat the above steps, but uncheck the “Run as dry run?” check box. Double and triple check that everything is correct, and then click on the “Run Search/Replace” button. Once it is completed, you can double check the results at the top of the page and click the “Click here” link to see detailed results.

Example of the detailed results page. Click on image to see larger image with more details.
You then want to check the front end of your website to make sure everything is linked correctly.
Updating Internal URLS Using Other Methods
Notepad++ – Great text editor that allows you to update your links quickly.
You can update the internal URLS within your web pages by using multiple other methods depending on your website platform. The main method is to automate it by using software to perform a search and replace function, enabling an update of hundreds of web pages all at once, saving hours upon hours of tedious work. There are several different types of programs that you can use to accomplish this, but for this example we will show you how to use Notepad++.
Notepad++ is a free source code editor that is similar to Windows notepad, but is more robust and allows you to write in several different coding languages.
Once you have downloaded and installed Notepad++ you will want to download a local copy of your website’s files, then perform a backup of them, just in case you make a mistake. Then, open up a page that contains code, such as an .html, .php, .asp, .aspx, etc.
To open the find and replace feature, hit the Ctrl, Shift and F buttons at the same time, or go to the menu bar, find the “Search”, then “Find in Files”, and you will be shown the following:

- In the “Find what” text area, enter in the http version of your website.
- In the “Replace with” text area, enter in the https version of your website.
- In the “Filters” text area, enter in *.* to search for everything
- In the “Directory” section, browse to the folder that contains all of your website’s files.
- Make sure the “In all sub-folders” checkbox is checked.
- If you want to perform a dry run or test run first, click on the “Find All” button. This will show you your results.
- Once you are happy with the test run, you can click on the “Replace in Files” button.
- Once it is done, you can upload the changed files to your web site.
You should now go to the front end of your website and test everything by viewing every page on your website and testing every link. If you have a very large website, this would be very time consuming and tedious. Of course, you can test this with a more automated system, such as using software. We will go over ways to do that in the following section.
Test Your Website To Make Sure All URLS Returned Are HTTPS and Not HTTP
After updating any internal URLs to HTTPS, you should then audit and test your website to make sure all of the URLS returned have HTTPS listed in your web browser’s address bar. If you have a small website, you can perform this manually. But, if your website is very large, you should use an automated method such as link-checking tools. We recommend ScreamingFrog SEO Spider. It is a very complex tool, and is not as user friendly as some other website tools, however, it is has incredible features which allow you to check just about anything with your website that most other tools are lacking.
Once you have downloaded and installed ScreamingFrog SEO Spider, enter in the HTTPS version of your website and then click on the start button.

Enter in the HTTPS version of your website, click on start. Once it is done, it will show all results that contain HTTPS on your website.
If you have a very large website, it might take a while to fully run. Also, the free version only allows you to crawl so many pages, so you might need to upgrade to the paid version that doesn’t have any limits. Once it is done running, the status bar will show as 100% completed.
At this point you will want to check if there are any HTTP versions of URLS of your website.

ScreamingFrog – HTTP results within HTTPS pages
In the search box you enter in the HTTP version of your website and this will then filter out the results to only show you pages that contain HTTP links in your website. To determine which pages contain these you need to click on the “InLinks” tab at the bottom. You then click on the filtered HTTP URLS listed in the “Address” section which will then show in the section below the page that contains the HTTP link in the “From” column, while the “To” column contains the actual HTTP URL.
If you have any URLS that did not change from HTTP to HTTPS, you will have to dig deeper to figure out why.
Some Reasons Why URLS Did Not Get Updated
Hopefully at this point, you don’t have any HTTP URLs showing up, because if you do, you will have to dig in deeper as to why the previous methods listed above did not catch it. In theory, the more elements that you have that control your website, the more apt you are to run into issues. If you only have a handful of URLS to fix, then you should manually correct them. But, if you have dozens or hundreds to fix, you should research it further to see if there is a more automated fix available.
Here are some possibilities for why your URLS did not update:
- Cache not cleared. Make sure your browser’s cache has been cleared out when you are checking.
- CMS cache not cleared. If your Content Management System has a built-in caching system, make sure you clear it out.
- Web hosting cache not cleared. Some web hosting providers have integrated caching systems, especially some dedicated WordPress hosts. Make sure you have your web hosting company clear your website’s cache for you.
- Conflict with Content Delivery Network. If you are utilizing a CDN then make sure you take that into account.
- Database issues – for example, URLs are encrypted when they were stored and are unreadable.
- Other technical issues
Once you have discovered and fixed any left over urls to update to the HTTPS protocol, and all of your URLS are secure, you should make sure that any website traffic that comes in is secure. You do that by setting up redirects.
Setting Up Redirects From HTTP to HTTPS Webpages
Now that you have completed your website transfer from HTTP to HTTPS, and you have tested everything on-site, what do you do about off-site links that are pointing to your website with the old HTTP urls? Or, what happens if someone comes directly to a non-secure URL direcly by typing in http://www.yoursitename.com ? You need to direct the HTTP website traffic to the HTTPS version of the page with redirects.
If you have a .htaccess file for your website, you can set this up from within it by adding in the following code near the top, just after the first RewriteEngine On call.
RewriteEngine On
RewriteCond %{SERVER_PORT} ^80$
RewriteRule ^(.*)$ http://%{SERVER_NAME}%{REQUEST_URI} [L,R,R=301]
This code snippet is a great catch-all that will take traffic that arrives at the HTTP version of any URL on your website and perform a 301 redirect to the HTTPS version of it. A 301 redirect tells the search engines that your web page has moved permanently. Once you have this set up, test it by typing in any non-secure URL or webpage on your website into your browser’s address bar and watch it magically redirect instantly to the secure version.
You should also test this by going to Redirect-checker.org and enter in the http version of a page to check if the redirect is working properly, and that the status code returned is 301.
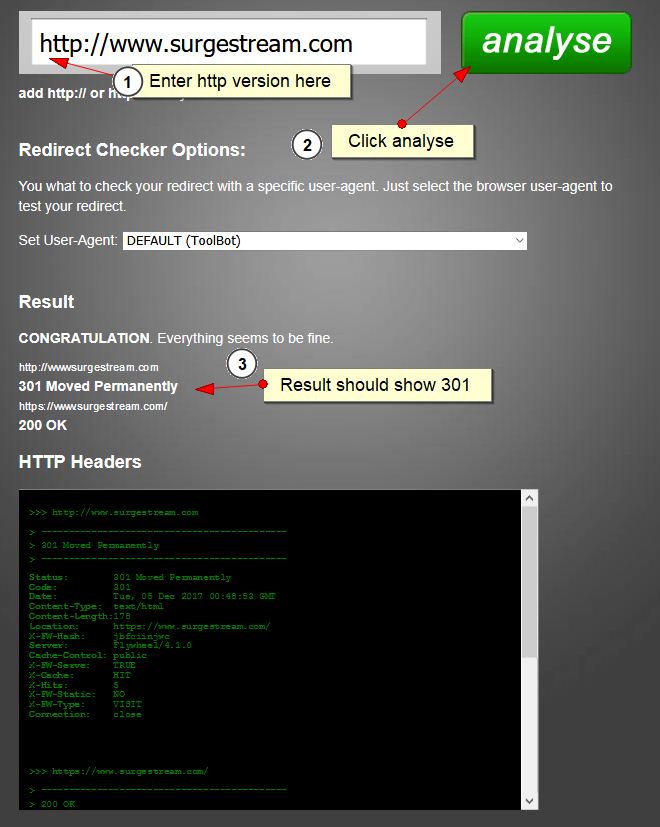
To check if your redirect is correct, first enter in the http version of the URL you wish to check. Then, click on the analyze button. In the results section it should show 301 – moved permanently.
You can also use ScreamingFrog SEO Spider to check for the HTTPS protocol and Status Codes.

Make sure you spidered the HTTPS version of your website. Then, click on the “Protocol” tab. Where it says “Filter”, select HTTPS. Look at the “Status Code” column and make sure they all return a 200 status code.
Other HTTP to HTTPS Migration Tasks You Should Perform
Now that you have taken care of all of your on-site and on-page tasks of migrating from HTTP to the HTTPS secure protocol, you should work on any off-site or off-page references to the old HTTP version of your website.
Update Any Tracking or Statistics References from HTTP to HTTPS
Google Analytics Update From http to https
If your website is using Google Analytics, you can simply update the Default URL settings from HTTP to HTTPS.

Update the Default URL from HTTP to HTTPS from within Google Analytics.
To do this, log into your Google Analytics account, click on the Admin gear icon on the bottom left. Then, under “Property”, click on “Property Settings”. Where it lists “Default URL”, you should select http:// from the drop down, then click on the “Save” button. That’s all there is to updating Google Analytics from http to https.
Google Search Console – How to Update to HTTPS Version
Updating your site from https to https from within Google Search Console (formerly known as Google Webmaster Tools) requires more steps than updating your Google Analytics account. You need to add the https version of your website by adding a new property. Follow the steps listed from Google on how to accomplish this.
When you are done adding the https version of your website as a new property within Google Search Console, it will take several days for Google to properly crawl your website before you see any results or statistics from within Google Search Console. In the meantime, make sure you have added sitemaps and any other settings you might have from the http version of your site within Search Console.
Update Social Media – Any Profile URLS From HTTP to HTTPS
If you perform social media optimization and have any social media accounts, you should log onto them and update any profile links to your website to begin referring to the https version of your website. Go to your Facebook page, Twitter, Pinterest, Google+, LinkedIn and any other social media accounts and make sure your profile links are updated.
Update Any External Links Pointing to Your Website from HTTP to HTTPS
This could become a massive project and honestly, might not be worth the effort, but if you have any other external links that are pointing to your website on 3rd party websites, you might want to consider contacting them to request to update those links from http to https. This task alone might involve thousands of links, many of which would be nearly impossible to update to, since most of these links are out of your control. Plus, adding that 301 redirect we mentioned earlier to your .htaccess file should in theory take care of these external links. But, if you want to have a really clean backlink profile, you might want to consider attempting this, but it is not for the faint of heart.
Make Sure Any Future Links Contain the HTTPS Protocol
If you have any current SEO programs in place, either in-house or with an SEO company, make sure they are referring to the new HTTPS version of your website with any link-building strategies in place.
Also, if you have any other advertising materials, such as business cards, letterheads or anything else that advertises your url, make sure it now refers to your new https version.
Summary
As you can see, migrating your website from HTTP to the HTTPS protocol is not an easy task, and depending on the complexity of your website, it may require many steps in order to complete it successfully. But, it is a worthy project in terms of updated security and the SEO boost it gives to your website.
Need Help Migrating from HTTP to HTTPS For Your Website?
If you have any questions about how to update your website to the HTTPS protocol, please feel free to contact us for assistance or fill out the form below. One of our site migration experts would love to help.
About SurgeStream
SurgeStream is a full service digital marketing and SEO company that works with small to medium sized businesses in order to help increase their website's online visibility.
Digital Marketing Got you Stumped?
We can dig deep into your website and can usually discover digital marketing "bottlenecks" where others can't. Contact one of the digital marketing professionals at SurgeStream to request a free evaluation.
SurgeStream Testimonials
View all testimonials
Website: Salem Specialty Ball

Website: inlingua Washington DC

More from SurgeStream's Blog
See all posts

